Whirlwind: Piecing the Background Fabric
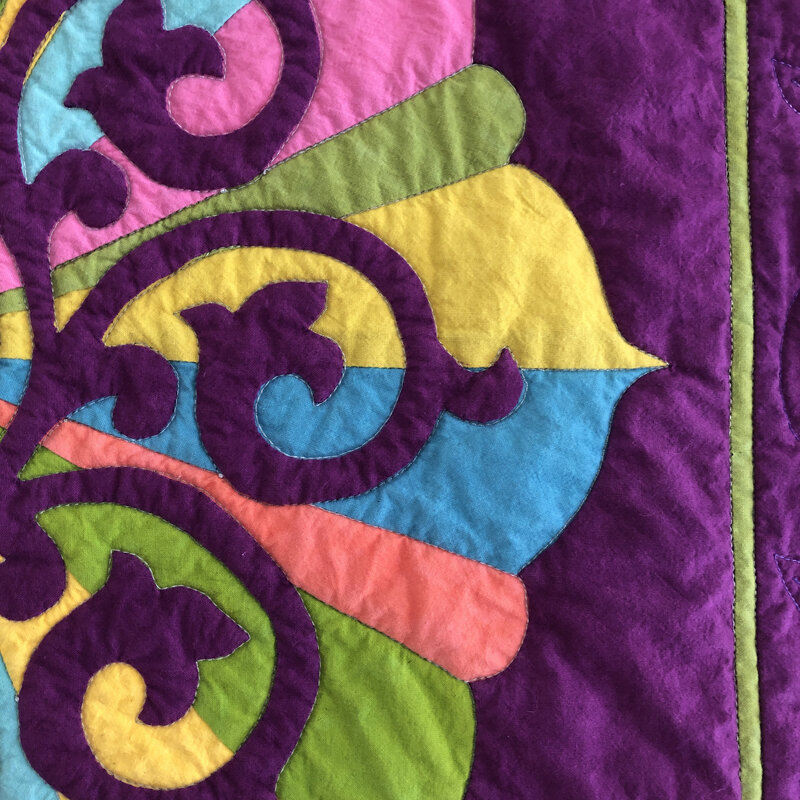
“Rays of Hope” fundrasing quilt donated to the Cancer Quilt Project 2018-19. Designed using our Whirlwind, Medallion VI for hand reverse applique.
Do you like creating outside - of - the - box? I do.
Last year I made the quilt “Rays of Hope” for the Ovarian Cancer quilt project using my Whirlwind Medallion VI pattern. I decided to have some creative fun. And what fun I had! It worked so well I just had to share it with you. Keep reading to find out how easy it is to do….
The open scallop edge of Whirlwind pattern.
Whirlwind, Medallion VI is a fun, beginner pattern, which has wide open spaces of background fabric. Surrounding the swirl design, and all this lovely open background space, is a frame of top fabric that has an open scallop edge. I think people often miss this when they look at the pattern.
My outside - of - the - box idea was to piece the background fabric.
I wanted my piecing to radiate out from the center in pie wedges. I decided to use the points of the scallops to define the size of my wedges.
I decided that the easiest and best way to piece by background was to employ a paper-piecing technique.
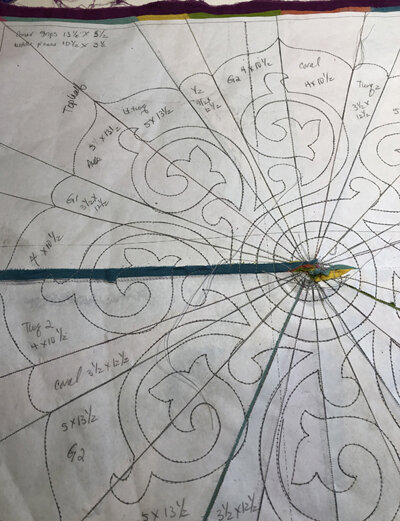
Creating my paper-piecing pattern of Whirlwind.
Creating a Paper-piecing pattern
So I began by tracing a full-size copy of my pattern onto paper. Next, using my 24” quilting ruler, I drew lines through the center from one scallop point to its opposite scallop point. At first I just drew the lines inside of the scallop edge and stopping at the lines for the swirl, which would be appliqued, to make sure I liked how it looked. But ultimately I extended those lines through the swirl design and out to the edges so I could sew on my fabric pieces.
SElecting my Cherrywood fabrics for the wedges of the pieced background.
Next I selected my fabric pieces. The Ovarian Cancer Quilt Project fabrics were provided by Cherrywood fabrics. I figured out the sequence of blue based and yellow based colors I wanted and made notes on my pattern. I measured my pattern wedges and added ¾” all around to those dimensions for my cutting dimensions.
My Whirlwind pattern piece is 27” x 27” which is a pretty large pattern for paper-piecing. So I cut it in half. I thought about cutting it in quarters, which you could easily do. Just remember on the cut edges to trim adding a ¼” seam allowance for sewing back together again later.
The background is pieced, and the two halved are sewed back together.
I began to paper-piece my two halves of background fabric. I paper-pieced my fabrics on using a 90/14 needle and a tight 1.8 mm stitch length. I’d lay a fabric on right sides together covering the line between adjacent wedges, pin and sew. Then fold back the pattern at the sew line, trim to a ¼” seam allowance. Open the fabric over the wedge space and iron. Then do the same for the next wedge color. And sew on and sew on, until done (ha,ha). When my halves were done, I sewed them together, but didn’t tear the paper away.
You see, my reverse applique design was also on this pattern, and next I needed to do the reverse applique.
Transferring the Reverse Applique pattern to the Top Fabric
Normally in our patterns designed for hand stitching, like Whirlwind, we would trace our design onto the wrong side of our background fabric. Then lay our top fabric on top of the background fabric baste, cut away and then stitch.
But now, we have the paper-piecing pattern on the wrong side of our background fabric. So I decided to try something else new: Machine basting.
I flipped my pieced background fabric over so the right side was facing up. I lay the wrong side of my top fabric on top of that and secured it with pins. Next I flipped it over to the back, the paper side, and went to my sewing machine.
Still with a 90/14 needle in my sewing machine, but now with my stitch length set to 4.5mm, I sewed, basting along the lines of the swirl design and frame. (See the blog Can You Baste by Machine?, posted 3/5/2019) I was careful to accurately baste on the curves, stopping and turning at the points so I kept the details of the design.
Machine basted from the back.
Machine basted from the front.
Following the patterns directions, I’m trimmed out and beginning to stitch. The centerand inside of near swirl is stitched.
Once I was done basting I removed the paper from the back of the piece and began to sew, following the directions in the Whirlwind, Medallion VI pattern. I loved the results that I got in this piece.
In our blog Piecing the Background Fabric: Stripes (posted 2/5/2019) we looked at how to piece a striped fabric for your background. And here we present paper-piecing as a way to create your background. Can you think of other ways?
This is an idea that works great in Whirlwind, but can also work great in other patterns. What other patterns would look really awesome with a pieced background?
I hope you’ll have fun creating outside the box. Quilting is a creative act of hope.
Happy Quilting!


